Showing posts with label Recipes. Show all posts

Wednesday, March 7, 2012

Chunky Banana Oatmeal

     I grew up on oatmeal breakfasts, and nothing like that warm, thick and creamy porridge can get me going on a tough day in school. For a change, I replaced mashed bananas for milk and it turned out really great. I added some chunky candied plantain bits to make it extra special.


Banana oatmeal:
  1/2 cup oatmeal (not instant)
  1/2 cup mashed banana
  1 1/2 cup water

Candied plantains:
  1 cup chopped plantains
  1/4 cup brown sugar
  1/4 cup water

Cooking instructions:
  1. Make the candied plantain. Dissolve sugar in water in a small pan, add the plantains, cover and cook over low flame until almost all the liquid is gone. Set aside.
  2. In the same pan combine water, mashed bananas and oats. Cook over medium flame, stirring continuously until thick.
  3. Transfer to a bowl or cup, add in the candied plantains and enjoy! Yummmmmm!

Sunday, March 4, 2012

Carrot Cake Recipe 2

Light and moist carrot cake

Ingredients:
  2 1/2 cups all purpose flour
  2 tsp baking soda
  1 tsp baking powder
  1 tsp sat
  2 tsp cinnomon
  1 1/3 cup brown sugar
  1/2 cup butter
  1/3 cup oil
  3 whole eggs
  1 tsp vanilla
  3 cups grated carrots (1 1/2 large carrot)
  8 oz can crushed pineapple

Cooking instructions:
  1. Preheat oven at 350 degrees. Line two 9" round pans with wax paper.
  2. Sift together flour, baking soda, baking powder, salt and cinnamon. Set aside.
  3. Cream sugar and butter. Add oil, eggs, vanilla and the juice of the canned pineapple. Whisk until smooth.
  4. Make a well on the flour mixture. Pour the eggs mixture and mix evenly.
  5. Mix together pineapple and carrots. Fold into batter.
  6. Pour half of the batter on each of the round pans. Bake for 30-45 minutes.


Monday, February 27, 2012

30 Minute Mac and Cheese

     This is actually more like a cross between baked macaroni and mac and cheese, but with a spicy twist. I have to say, the spiciness really gave it a kick which was just pure awesomeness.


     Note: I included the brand name for what I used so that I wouldn't forget. :)

Ingredients:
  700 grams elbow macaroni
  100 grams leftover ground beef
  2 packs (200 grams) Hunt's tomato sauce
  1 carton (250 grams) Nestle cream
  3/4 brick Eden Easymelt, finely grated
  1 bottle (250 grams) Papa Banana ketchup
  2 shallots,  chopped
  3 cloves garlic, minced
  Italian seasoning
  4 tbsp brown sugar
  1 pc chili pepper (red, long), minced

Cooking instructions:
  1. Cook macaroni as per package instruction minus 2 minutes.
  1. Saute shallots and garlic. Add ground beef and minced chili peppers.
  2. Pour in tomato sauce, cream, cheese and ketchup. Mix evenly and bring to a boil.
  3. Add brown sugar and Italian seasoning to achieve desired taste.
  4. Add in cooked macaroni and simmer for 2 minutes.

Friday, February 24, 2012

Japchae - Korean stir fried noodles

     My sister loves Korean food but I'm not all hyped about it as she is. For her sake I allowed her to take me and my dad to this Korean restaurant she's been raving about for lunch. The food served was surprisingly too oily (I don't know if that's what Korean food should be, or they just put too much oil). I forgot what we ate but there was this noodle dish that was really good, and my dad and I instantly got hooked. It was Japchae, a sweet and savory Korean stir fry noodles that looked like bihon except that the noodles were bigger. Despite having just a few ingredients, the noodle itself was the star as it seem to absorb all the flavors. It was called cellophane or glass noodles, made of sweet potato starch.

     A few weeks ago my brother brought home a big bag of this cellophane noodles and as you can see a bag (1 kg) contains 3,400 calories. Not so figure friendly, as it's made of starch. But trust me, it's good. And as my brother is my brother who loves everything spicy, he made his version - well spicy.


     Luckily he only used half the bag and this morning I saw it lying around I thought I might give it a try. I didn't have the 'essential' ingredients though - shitake mushrooms, beef strips and spinach. But I made one anyway, using the vegetables available.

     Surprisingly, it turned out good. I didn't add a lot of sesame seed oil as directed as I didn't want it to be so oily, but despite that, I was happy with the results.


     This recipe is just trail and error, so I wasn't very particular with the proportions especially with the vegetables.

Ingredients:
  500 grams cellophane (glass noodles)
  chicken breast (cut into strips)
  cabbage
  carrots (cut into matchsticks)
  sayote (cut into matchsricks)
  purple cabbage
  2 shallots
  3 cloves garlic
  4 tbsp brown sugar
  4 tbsp soy sauce
  2++ tbsp oyster sauce
  1 Knorr beef cube
  sesame oil
  sesame seeds (toasted)
  salt and pepper to taste

Cooking instructions:
  1. Marinate the chicken breast with enough soy sauce and 1 clove of garlic as you prepare the other ingredients.
  2. Cut the noodles using a pair of scissors as they are long and stiff and may slide off the wok when cooking. Other recipes boils the noodles first, but for it to absorb a lot more flavor, I prefer to cook them with the sauce.
  3. Saute the onions until translucent, add garlic then chicken. Fry until the chicken in slightly brown.
  4. Add the carrots and sayote. Season with salt and pepper. Stir fry for 3-4 minutes.
  5. Add soy sauce, oyster sauce and sugar. Mix.
  6. Add the cabagges. Stir fry for 1 minutes.
  7. Add 2 cups of water and the beef cube. Add in the noodles and mix until the noodles are covered with the sauce. Lower the heat and cover to allow the noodles to cook (5-10 minutes). Check and stir often.
  8. When the noodles are cooked add sesame oil according to your taste. 
  9. Top with toasted sesame seeds and serve.


Saturday, February 4, 2012

Pininyahang Manok (Pineapple Chicken)

    After weeks and weeks of waiting, the pineapples are finally back! I was so happy when I saw piles of them in the market, and decided instantly to make pininyahang manok (pineapple chicken) for lunch. Fresh pineapples are way better (and cheaper!) than canned ones.


     Whenever I google pininyahang manok I always end up with recipes using milk, which is not the case of the one the grew up with. It had brown sauce, much like adobo, but with pineapples. I made it that way, but it still didn't taste like the one I know. The next time I'll add Sprite and perhaps come up with the recipe.


cute little pineapple

Tuesday, January 31, 2012

Mango Jam

     There was a time when my father owned a small plantation of mangoes and not a summer goes by without baskets and baskets of mangoes. Daddy doesn't sell the mangoes, so all the fruits are for our personal consumption, which means that one of our bedrooms will be filled with green mangoes for ripening. I don't remember whether we eat them all or give them away, but mama would always make jars of mango jam from the overripe fruits. But one typhoon later and all the mangoes were gone, and so was the mango jam.

     One morning I went to the market and found a fruit stall that sold overripe mangoes. I bought about 3 pounds for only P50 (a little over a dollar) and was so excited I made jam when I got home. I forgot the mango to sugar ratio mama used when she made her jam, I was thinking maybe 1:2, but I was torn whether which one was the mango part or the sugar part. In the end I added sugar as I go, so i think it was about 1 part sugar to 2 parts mango. I made about 800 ml of mango jam that filled 2 jars.

     You can have mango jam on it's own or on toasted bread or crackers. Today I had them with ibus (steamed rice cakes) and boy were they soooooooo good. Mangoes in itself is great with ibus, but mango jam was even better. 


Ingredients:
  ripe mangoes
  sugar
  salt

Cooking instructions:
  1. Slice the mangoes into 3 along the flat side of the seed.
  2. Remove the flesh by spoon the flesh the mango cheeks and scraping the seed.
  3. Puree with a food processor or mash with a fork. I prefer to just mash it roughly because cooking it with still soften them.
  4. Place the puree on a skillet with the desired amount of sugar and salt (I added 1 tsp) and allow to boil using medium to high heat.
  5. Stir with a wooden spoon and lower the heat as it thickens. Stir until desired consistency is reached, about 20-25 minutes.
  6. Let it cool, bottle and refrigerate.

Sunday, January 29, 2012

My Perfect French Toast


     Bread from popular brands like Gardenia and Angelina contain preservatives that they don't stale for weeks and weeks, and fresh bread is no good in making french toast. From experience, they're soggy and thin even after frying, and the middle layer would end up white and untouched even if how long you dip them. That's why when I want to make french toast, I get my loaf bread from local bakeries because after a day or two, they're stale enough, or what we call day-old bread. Day-old bread absorb the batter like sponges they make perfect french toast.

Ingredients:
  2 whole eggs
  1 cup milk
  1/3 cup flour
  1/3 cup sugar
  1/2 cup vanilla
  1/4 tsp cinnamon
  some day-old bread
  butter for frying

Cooking instructions:
  1. Mix all ingredients in a bowl.
  2. Dip both sides of each bread, but for no more than 10 seconds on each side.
  3. Heat your skillet with medium heat. Grease with butter.
  4. Fry the bread until each side turns golden brown, about 1-2 minutes per side. Add butter as necessary.

Thursday, January 26, 2012

How we eat our Watermelon

     Watermelons are very juicy fruits and are very refreshing especially during summer. Here in the Philippines we enjoy them all year round. Eating them can be a messy business, though, but mama always had a way with everything. She would seed and dice the watermelons and add calamansi (Philippine lemon) juice to make a punch. We have it for dessert or just as a refreshing snack. Everyone loves them that it's gone within a day.


As for me, I added some apple and pineapple bits to make them nice and crunchy. Yummmmm!

Tuesday, January 24, 2012

Inday-Inday - memories from my childhood

     Today I made inday-inday and I can't help but feel so giddy about the success of this snack. It tasted EXACTLY as I remembered it, and it had been years since I ate last. Inday-inday or palitaw, is a native Filipino snack made of flat, sticky rice dumplings topped with sugar and sesame seeds and/or grated coconut. My mama would made these when we were young, and I remembered how my sister and I would enjoy shaping balls out of the white dough.


     In school, vendors would wrap them in banana leaves and we would eat them using popsicle sticks. I would always tell the vendor to add more of that sweet sugary topping. Yummmm! Oh how I miss high school.

toasty and nutty topping, tastes like peanut butter


Ingredients:
  2 cups glutinous rice flour
  1 cup water
  2 tbsp sesame seeds
  1/2 cup brown sugar

Cooking instructions:
1. Combine 2 cups of glutinous rice flour and 1 cup of water until you form a dough.
2. Roll into 1-inch balls and press the center to flatten.
3. Drop the dough into a pot of boiling water and remove as soon as it floats.
4. Drain.
5. For the topping, toast the sesame seeds.
6. Grind in a food processor the toasted sesame seeds and the brown sugar until smooth. Adjust the amount according to your taste.

Monday, January 16, 2012

Zero Fat Banana Muffins - an Experiment

     When replacing fats in fat-free baking, it is often recommended to use applesauce or fruit purees. I've successfully tried to replace eggs before with mashed bananas in banana bread before, but I've never tried to completely eliminate the oil or butter. I've read somewhere that green papaya is high in pectin, and since pectin the sought-after component in applesauce and other fruit-based fat substitutes, I decided to give green papaya a try. I juiced half a green papaya and decided to make banana muffins.


     I followed this banana bread recipe and replaced the same amount of oil with green papaya juice, and 1/2 cup mashed bananas for every egg. I used ripe plantains and pureed it using a food processor. I discovered that it's more moist when I puree the bananas instead of just mashing it. This recipe can make 12 muffins.

Ingredients:
  1 1/2 cup all purpose flour
  1 cup brown sugar
  1 tsp baking soda
  1 tsp salt
  2 cups banana puree/mashed bananas
  1/2 cup green papaya juice
  1 tsp vanilla essence

Cooking procedure:
  1. Sift and combine all dry ingredients. Mix thoroughly and evenly.
  2. Combine all wet ingredient and mix together evenly.
  3. Add the wet ingredients into the dry ingredients and mix well until a batter is formed.
  4. Lightly grease the paper cups and pour the batter up to 3/4 of each cup.
  5. Bake in a preheated 350 degree oven for 10 - 15 mins.
  6. Remove from the oven and allow to cool.

     I was so happy that the muffins rose more than I expected it would. The first thing I noticed was there were less of those little fibers or stringy things that I see in my other banana breads. The color was also lighter. My theory is that since green papaya contains a lot of enzymes and is an effective meat tenderizer, I believe that the enzymes broke down those fibers. Just a theory. :)


     I was more than happy with the result. It come out soft and moist, like it was just like any regular muffin/cupcake. You cannot even tell that it's vegan. You can taste the green papaya behind the banana flavor but it's not overpowering. Overall this experiment came out a success and I'm looking forward to using green papaya in other recipes. I'm happy to boast that this is an absolutely all natural fat free recipe. Cheers! :)


Friday, January 13, 2012

Lesson learned on a Friday the 13th

     I'm not superstitious so even if yesterday was Friday the 13th, it was just any ordinary day for me. I got up early as it didn't rain that morning and took my morning walk to the city. When I got back home an hour later I decided to make some corn muffins after I stumbled upon this post of corn muffins a la Kenny Rogers. It was the first time I'd be using cornmeal and I was so excited.

     Cornmeal isn't actually sold here in my city so I had to make one myself. I bought a bag of popcorn and had it milled at the market. Because I haven't seen cornmeal before, I wasn't sure of the consistency of the grind. I thought that if I have it milled too fine it might end up like cornflour, so I decided to have it coarsely ground. I also bought some raw sweet corn.


    I steamed the sweet corn and shredded the kernels, and then followed the recipe as per instruction.While I waited for it to cook, I made some natural Buko shake (coconut smoothie). Dad bought coconut yesterday and there were leftovers.Since coconut spoils easily we store them in the freezer. It was very convenient that the coconut water was semi-frozen so I didn't have to add ice or water. It tastes so good and is actually better than the commercial Buko Ilonggo served at the mall. I just had to add very little sugar as the coconut water itself is sweet.

     When I pulled out the muffins from the oven I was surprised that it didn't rise. I was so expecting the same result from the recipe photos. And then when it was cool enough I gave it a try...


     I opened it and saw all the corn kernel goodness within. It smelled so good. But when I took a bite I knew immediately what went wrong. The cornmeal was still coarse and the muffins had a rough texture. It tasted good, though, but wasn't as appetizing as it wasn't smooth. I was surprised that my dad liked it, he ate a lot actually. He said it tasted good nonetheless and his dentures can handle it. Awwwww. :)

     Lesson learned, next time I'll have the cornmeal ground very fine.

Thursday, November 17, 2011

Express Ube Halaya "Purple Yam Dessert"

     Ube Halaya is a traditional Filipino dessert made from purple yams (ube) that is served during special occasions and is also an ingredient in making halo-halo. Ube or purple yam is basically a sweet potato that is purple in color. They are low in calories, high in vitamin C and A, and has a lower glycemic index than potatoes.


     Ube Halaya is very easy to make because it only needs 2 ingredients: yam and sweetened condensed milk. However, it's quite tiring and time consuming to make because it requires cooking over a low flame with continuous stirring until it thickens. This is why it is a "special" dessert.

   This is an express version of Ube Halaya because it does not require the exhausting stirring. I made this with less condensed milk than usual so it is less sweeter which brings out the rich Ube flavor.

Ingredients:
  1 kg Ube (purple yam)
  1 can (300 ml) sweetened condensed milk

Cooking instructions:
1. Peel and steam the yams until tender. You can also use the canned ones.
2. Chop and then grind in a food processor. Add the sweetened condensed milk and continue to blend until smooth and thick.
3. Transfer in a mold and refrigerate.

Wednesday, November 2, 2011

Angel Food Cake

      Angel food cake is every weight watcher's dream, it's light, fluffy, perfectly sweet, packed with protein and contains no fat. I call this a meringue cake, or meringue with flour, because the ingredients is basically for that of a meringue plus cake flour.


     There are only 3 important ingredients in making an angel cake: egg whites, sugar and cake flour. That's it, easy right? Making an angel cake requires a bit of skill and technicality, plus you have to be quick. This is the first time I made angel food cake, as requested by my Tita. I was a bit hesitant to make them because I didn't want to worry about the leftover yolk. But yet I gave it a try.
   
    Because this is a trial bake, I only used a half recipe, with equal flour to sugar ratio.

Ingredients:
  1/2 cup cake flour - sifted twice
  1/2 cup white sugar
  6 egg whites at room temperature
  1/2 tsp cream of tartar
  1/4 tsp salt
  1 tsp vanilla extract

Cooking Instructions:


1. If you have a food processor, it is preferable to grind the sugar granules into powder. This will help in making the cake light and airy. But if you don't have a food processor, it's ok. Divide the sugar in two and mix the other half with the flour.


2. To separate the egg white from the yolk, it's best that the eggs are still cold. But to whip the egg whites to they're highest peak, they must be at room temperature. So separate them cold but whip them at room temperature.


3. Separate the egg white from the yolk. Remember to hold the shell upright as you open it, this will prevent the sharp edges of the shell from piercing the yolk. 


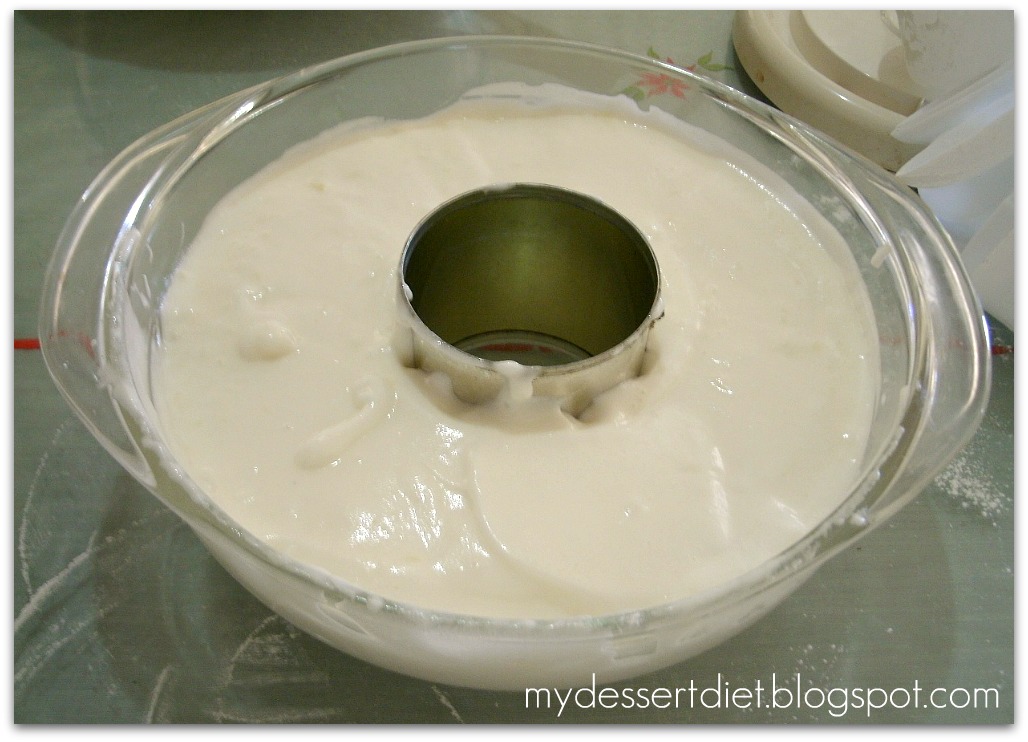
4. I didn't have a small tube pan, so it was time to be resourceful. I used a Pyrex dish and put an empty can in the middle. The reason for using a tube pan is that it leaves room for the air to circulate to make the cake rise. Remember that we don't use any leaveners and depend on the air trapped in the whipped egg whites. Make sure the pan is clean and ungreased.


5. Add the cream of tartar and whip until foamy. Make sure the bowl is clean and without any traces of oil, fat will not make the whites whip properly.


6. Add half of the sugar a spoonful at the time and whip until glossy stiff peaks form or about 5 mins.


7. Sift the flour & sugar mixture a quarter at a time into the meringue and quickly but carefully fold them in until no more flour is seen. Do not overmix as to not loose the trapped air.


8. Add in vanilla to finish the batter.


9. Pour into pan and smoothen. Bake in a preheated 325 degree oven for 20 - 30 mins.


Mine took about 25 mins and was a bit overbaked, maybe it was a minute or two overdue.


10. Immediately invert the cake and let it cool for 1 1/2 hours. This will make the cake maintain it's shape.


11. Scrape the sides.


12. Remove the can.


13. Slice and serve! Top with fresh fruits, whipped cream or jam. I love them plain.

Thursday, October 20, 2011

Rellenong Bangus (Stuffed Milkfish)

     I wasn't a fish eater, but when I turned 14 I had to be one because during the Lenten Season we had to fast and that meant to abstain from any food product that was pleasurable, and one of those is meat. But this dish is not something that isn't pleasurable at all, in fact it is a special dish. Not because the ingredients are expensive, but because of it's tedious preparation. It's like a fish version of embotido, but the skin is left as intact as possible to stuff the fish. So you would need the help of a fish monger to clean, debone and remove the meat with the skin intact.


     However, I would just prefer to sew to skin together so that we can clean the fish more thoroughly. This version is low-fat so I will skip the traditional way of frying the fish before stuffing and using eggs as a binder. We also had some leftover Sinigang na Bangus (Sour milkfish soup), so I didn't need to add any extenders (i.e. potato). With all that and it being steamed, this will have a more delicate and fresh bangus flavor.

Ingredients:

  1 medium-sized bangus (about 1 lb), deboned
  leftover sinigang na bangus (about 1 lb)
  1 carrot, diced
  3 onions, diced
  1/2 cup raisins
  1/4 cup pickled relish
  1/3 cup bread crumbs
  1 tbsp soy sauce
  1 calamansi or 1 tbsp lemon juice
  salt and pepper to taste

Cooking Instructions:

1.  Using a spoon, scrape meat from the skin of the clean and deboned fish.


2. Marinate the skin in soy sauce and calamansi. Set aside.


3.  Remove the skin from the leftover sinigang, flake (I just mushed between my fingers) and remove any remaining bones. Save the broth. Cook the fresh fish meat in the sinigang broth, drain and let cool. Flake and remove any remaining bones. Mix all the meat together.

4. Add the carrots, onions, pickle relish and raisins. Mix well. Season with salt and pepper to taste. Add the breadcrumbs until it's dry enough to form into balls, add more if the mixture is too wet.


5. Stuff the skin with the mixture and sew as you go.


6.  Roll the rest of the mixture in aluminum foil. Seal the edges.


7. Steam for 30 or more minutes.


8. Let it cool and serve. Enjoy!


Monday, October 17, 2011

Frozen Corn Pudding Ice Cream

     I wanted to make Maja Maiz or Corn Pudding but father dearest placed it in the freezer and oh dear Lord was it so much better frozen. It was thick and a bit gooey, it was even better than ice cream.  Seriously.


     I'm the kind of person who doesn't usually wait for the dessert to cool down before I devour it. So my short cut to cool them down fast is to place it over a bed of ice with salt. I have a stack of ice tubes in the freezer and what I do is crush them roughly, sprinkle with a lot of salt and put in a 12"x13" baking pan as I place the hot pan on top. The salt will lower the freezing temperature of the water, so despite the heat coming from the pan, it will not melt easily. 

     This is the chemistry I learned from eating dirty ice cream as a child. Here in the Philippines, ice cream is sold in the street by sorbeteros, dubbed as "dirty" because of the manner in which they are sold - in the streets by maybe-not-so-hygienic men. And so to keep the ice cream frozen despite the blazing tropical heat, they put salt on it. It's called pot-freezer method and used to make homemade ice cream.

     You can mix it until it's frozen, but I just do it until it's cool enough to pop in the fridge. I think this method helps with making it extra creamy.

Ingredients:

  1 can condensed milk (300 ml)
  2 cups fresh milk
  1 cup water
  3/4 cup cornstarch
  1 can cream-style corn (425 g)

Cooking instructions:
1. Dissolve cornstarch in water. Add in milk, condensed milk, salt and corn.
2. Bring to a boil over medium-high heat while stirring constantly using a wooden spoon.
3. Bring the heat to low and stir continuously until thick. Remove from heat.
4. Place pan on a bed of ice with salt and stir continuously until cool.
5. Transfer to container and freeze.
6. Allow it to soften before serving. Enjoy!

Friday, October 14, 2011

Pumpkin pudding with pumpkin cream

     I love to experiment, and since the successful diet soda cake, I have been so excited to try on making non-fat desserts. First thing I wanted to make was a flan cake, specifically a pumpkin flan cake. I thought it was a bit far fetched, but when I saw this Pumpkin Spice Cake-flan, I was inspired to give it a go. I was amazed at the chemistry of how the cake batter and the flan mixture swapped places during baking, that even made me more excited.


     But since I wanted it to be as non-fat as possible, I just used 1 egg for the flan and adapted the soda cake mix (without the soda). Was I expecting too much or was I just too excited? Coz when I took it out I was just wonk-wonk-wonk. The flan just became a cream and didn't set at the bottom, the cake became a pudding with the caramel at the bottom. I'm still new at the laws of baking and ingredient proportions, so I'm just figuring out what exactly I did wrong.

     I was disappointed, yes. But after I let it cool down and had a bite my eyes popped. It was sooo good. I loved the creaminess of the custard over the pudding with that hint of caramel at the bottom. It was just perfect, I will definitely make this one again, or maybe dissect it and use the cream as a filling for cream puffs. Hmmmm I guess I have more experimenting to do.

Ingredients:

FLAN
   1 cup pumpkin puree
   1 can condensed milk (use only 1 cup, leave rest for pudding mix)
   1 medium whole egg
   1 tbsp vanilla extract
   1/2 cup sugar (for the caramel)

CAKE
   1 cup flour
   1/8 cup cornstarch
   1/4 tsp baking powder
   1/4 tsp baking soda
   1/4 tsp salt
   2 cups pumpkin puree
   1/3 cup condensed milk (leftover from can)
   1/3 cup sugar
   1/2 cup water

Cooking instructions:
1. Caramelize sugar on the cake pan over low heat and evenly cover the surface of the pan. Set aside.
2. Prepare the flan. Beat the egg. Mix pumpkin and milk and add the beaten egg. Mix well then add vanilla. Set aside.
3. Prepare the cake. Mix together pumpkin, condensed milk, sugar and water until well blended. Set aside.
4. Sift dry ingredients and add to pumpkin mix. Mix well until no more flour is visible. The batter will be thick.
5. Pour cake batter evenly on caramelized cake pan. Sieve the flan mixture while pouring it on top of cake. 
6. Steam for 45 mins - 1 hour.

     So this is what I did, I'm not saying you do the same, too. Maybe you can help me improve it?
  

Thursday, October 13, 2011

How to make Chayote "Apple Sauce"


     This is a chayote, in the Philippines we call it sayote. It's a vegetable that's related to zucchini and cucumber, most commonly used in salads and stir fries. It has only about 39 calories per cup, nearly fat free, high in fiber and folate. 

     Chayote has almost no flavor of it's own, so it has to be paired with something to give it flavor. It is similar in texture with apples and there is even a rumor that McDonald's used them as an extender in their apple pies. I have tried making an "apple" pie using chayote, and yes, you can't really tell the difference except maybe the lack of apple flavor.

     But did you know that you can also substitute apples with chayote in making apple sauce? Chayote, like apple, is also rich in pectin. Pectin, as we know, is an insoluble fiber that's a gelling agent in jams and jellies. In vegan baking, we use applesauce to replace fats because it is a good source of pectin. Pectin, in place of oil, prevents gluten formation in flour to make cakes light and fluffy. Click here for further reading.

     Since chayote has almost no flavor, there won't be any distinct taste when used in baking, unlike applesauce which gives you a distinct apple taste. It's also a lot cheaper.

HOW TO MAKE CHAYOTE "APPLE SAUCE"


Peel and chop the chayote into small pieces.


You'll notice some little hairy filaments. We'll remove that by seiving it later.


Pop it in a food processor and blend until it turns into a mushy pulp.
This would be the raw "apple" sauce. I don't know what difference it makes when using raw or cooked applesauce in baking. If you want to use it raw, just sieve this and store in a jar.


For cooked applesauce, put it in a saucepan over medium heat. Cover and stir occassionally for 30-45 mins.


I just used 1 cup, without any water, so I stopped at 15 mins because it was already getting dry.


Raw vs cooked applesauce. The main difference would be the water content, I guess. The water would evaporate during cooking.


Raw and cooked apple sauce
Related Posts Plugin for WordPress, Blogger...